http://teahabs.blogspot.co.uk/ about home Image Map

new

new
Showing posts with label weave. Show all posts

Saturday, 25 August 2012

Weave Week Round Up


During Weave Week one of my main sources for information has been “200 Braids to Loop, Knot, Twists and Weave” by Jacqui Carey. I’ve managed to try out many of the 200 featured designs and adapt some of them into tutorials I’ve posted over the last two weeks.  I’ve literally taken this book everywhere with me during this time, (I had a lot of interested glances whilst braiding on the train) so it’s lucky (or genius) that it’s the perfect travel size. Compact, without losing any of the detail.


Initially the cover of this book didn’t particularly excite me. The colours are dull and old fashioned, and the layout is a little dated. I’m never put off by a books cover, especially technical craft books. I know from experience that the old girls really know what they’re talking about and a lot of modern books that are all about appearances cannot compete with the technical wealth of knowledge in their older counterparts. I just feel it’s a shame the cover does not reflect the exciting bursts of colour and modern, clean layout that is throughout the inside the book.

The inside has been cleverly put together so you can either read about all the techniques and equipment, or go directly to the back, pick a design, and get going straight away. The instructions are clear and well illustrated. The lazy side of me did have a go at a couple of techniques from just the pictures. This did not turn out well. I highly recommend reading the instructions as well. After discovering this I easily completed each of the braids I tried.

As an avid DIYer I was particularly pleased with a make it yourself theme running throughout the book. As well as showing and explaining various pieces of professional equipment, it gave examples of where and how you can make and adapt everyday objects to achieve the same effect. My favourite has to be tying the threads to your foot to keep the tension. So simple, but I would have never thought of it!

The only negative I would mention is that many of the 200 braids are variations of a theme. This really refers to the amount of designs that are in the book rather than different techniques. Just a little deceiving but there’s still plenty to keep you busy.

Overall I’m impressed with how much I’ve learnt after reading the book. There are many new techniques I’ve never seen or tried before, so I’ll be keeping this book in easy reach for anytime I have my hands full of cords, or ribbon, or wool, or chain….


Once again I feel like I could carry on exploring this theme for another two weeks! But we need to move on. Come back tomorrow to find out what the next theme will be! Fran xx


Thursday, 23 August 2012

A Little Extra Ombre Tutorial.


I originally made this tutorial up for this weeks tutorial Tuesday, but I decided to go with the necklace because I thought this one looked a little too similar to the plaited bracelet tutorial so it wasn't like I was giving you guys anything new to look at! I decided to put this up in the end though just because it shows in better detail how to plait into chain, which believe me, takes a bit of practice.

Ingredients:
9 metres of cord (3 metres of each colour)
18cm of chain x 3
Bell closer with extension cord and clasp attached
Glue


Instructions:Cut each metre of cord into 3 section (giving you 9 pieces in each colour) / Put them all together and glue into the bell closer / Section off one colour and begin to plait into two of the chain pieces / Make sure you keep to the same pattern. I have chosen to go from under the middle, over and into the chain / Continue until the end of the chain, then do the same with the second colour of cord, plaiting into the second and third chains / Once at the end of the chain, take the third colour cord and plait that into only the third chain. trim the cords and glue into the other bell closer / Avoiding the urge to wear, leave the glue to dry ( half an hour max) and your done!


Wednesday, 22 August 2012

Two Minute Teahab


Hi. I wanted to share with this little genius with you today! The mini knitter...


I have to be honest. initially I didn't have very high hopes for this piece of sparkly plastic... but boy, can looks be deceiving. I know from previous experience that it can take more time learning to use these types of gadgets than it takes to make 10 things "the long way". This was quick, had relatively well illustrated instructions (some common sense was involved here) and is pretty damn addictive.


To make the finished pieces into bracelets I've used some of the techniques in from my previous posts; Attaching clasps Part one and Part two.


TOP: 1mm cotton cord / MIDDLE: Acrylic wool yarn / BOTTOM: Embroidery floss

I'm really happy with the results. I'd like to experiment with threading chain and/or beads into and through the tubes, and I also want to research if it's possible to make tighter stitches to produce a more condensed pattern with the thinner embroidery threads. Definitely something to look into!

Hope you've enjoyed the post today. Fran xx

Tuesday, 21 August 2012

Tutorial Tuesday


Ingredients:

25cm/10 inches large link chain
1 metre/40 inches small link chain
1 metre/40 inches of three other types of cord
4 x box clasp/cord ends
1 x lobster clasp
2 x jump ring

 
Instructions:
Attach the three cord strands together using the box closer or cord end (find out more information about using these here). Alternatively wrap with wire (see how to here) and attach the chain to this using a jump ring / Using a safety pin or hook secure the piece to a sturdy surface / Lay out your four strands and number 1 to 4 / Take strand 1 and take it over strand 2 and 3, to lay between strand 3 and 4 / Take strand three (which is now second from the left) and take that over strand 2, to lay to the far left / Next take strand 4 over to lay between 3 and 2 (that are now the first and second strands from the left) / Then take strand 2 (third from the left) over to the furthest right point.


Continue step 2-6 along the whole length on the 4 strands / Secure at the end with a second box clasp or cord end and jump ring / Take a 12 inch section of the larger link chain and weave your braid through the links / Attach box clasps onto the chain links and position in the middle of the braid / squash your box clasp or cord ends over the cord section of the braid / Attach a lobster clasp onto one of you jump rings.


I really love the idea of building this up to create a multistrand, woven multistrand necklace! (if that makes any sense at all!) Maybe I'll do that for the end of week round up.

I've been working on making all my tutorials more beginner friendly. I realise that without written instructions it can be a little difficult to get your head around some of the more technical aspects. Going back and writing all of the tutorials up is pretty daunting, and with my ever increasing work load it is going to take me some time, but I'll make sure to write up all the new ones as I go. If there are of my previous tutorials you think are particularly tricky, or difficult to understand please let me know and I'll get them done first!

I'm working on yet another tutorial for this week based on my plaited bracelet tutorial, but with a little extra ombre added, because, well we all love ombre! That will be up later this week, and tomorrow I'm making bracelets out of some mini knitting... all very exciting stuff! Hope you enjoyed todays post. Fran xx

Saturday, 18 August 2012

How to: Attach clasps part two


Hi! As promised here is the second part of our How to: Attach clasps series. I wanted to mention here that these are just examples of how to use these findings. There are no set in stone materials and ways to use them (I can see the jewellery making purests screaming at their screens right now!). The way I see it is, if it works, then why not! Anyway, lets get going.

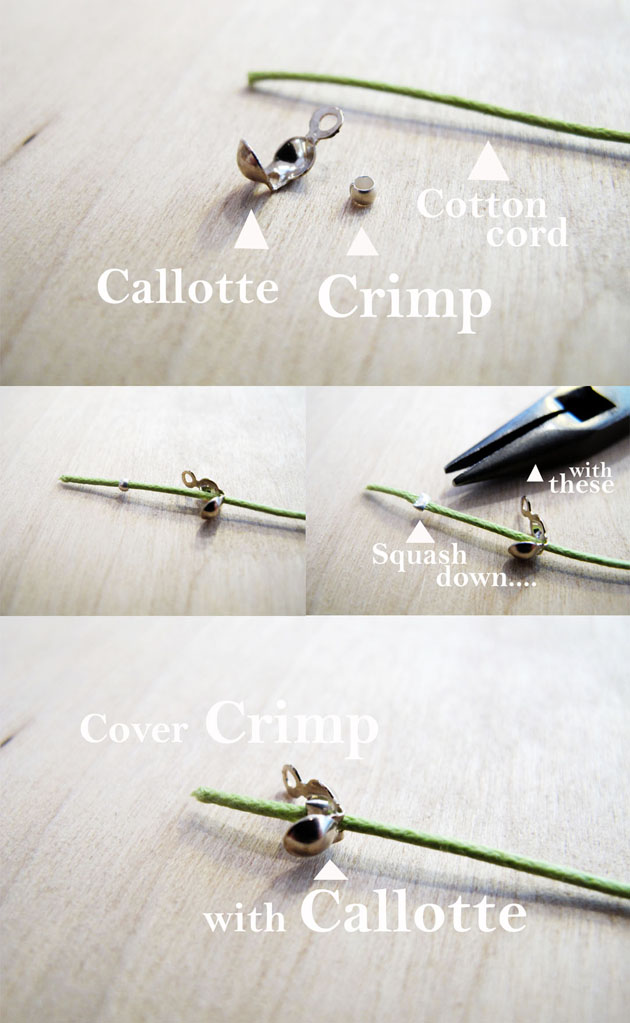
Number 4: Crimps and Callottes

Crimps are incredibly fiddly to use, so be prepared to loose a few because they ping off everywhere! You can buy crimping pliers, something I actually love using, but if your just getting started any pair of pliers with a flat surface will do just fine. An example of another way to use crimps is teahabs morse code bracelet tutorial.

Number 5: Wire Guardians
This is similar to using crimps with callottes but is a better solution if your making something heavy, or that needs to be particularly strong. The wire guardian protects the wire/stringing, and if required you can add extra crimps to give extra security.

Number 6: Wire wrapping.
If you have several strands to put together it can look a bit messy to inividually end each thread, especially if they're all different. One way to combat this is using wire to create your own ending.
You can wrap the wire neatly or if you're like me, in a chaotic fashion. Both ways can look great. It just depends what you like.

Like I said in Part 1, I have not covered every way you can attach clasps. There are plenty more ways that might suit you better or give better results. These are just some of my favourites.


Friday, 17 August 2012

How to Attach Clasps: Part one

Hello everyone!
I've put together what was originally meant as one post about attaching clasps to different stringing material. It's probably one of the questions I get asked most about in the shop, and like a lot of things in jewellery making, it's so easy once someone shows you how!
Just so you know I have in no way created a comprehensive list of the different techniques available, but the 6 techniques I have described are far too much for one post, so I'll post part 2 tomorrow.

Number 1: Using box clasps/cord ends


One example of using this technique is the Plaited Bracelet tutorial. It can be used on pretty much any material, and is especially useful when using thicker stringing like faux suede or leather.

Number 2: Crimp Tube with Loop
This is a fantastic way to quickly and neatly attach a clasp to thinner cords. As with all of the other techniques shown in these two posts, it is entirely up to you which clasp to use with each finding type.

Number 3: Ribbon Ends
I think the best thing about the ribbon ends is that it keeps the ribbon/fabric nice and flat all the way around. It's a super way to keep a necklace/bracelet looking sleek and professional. Another great thing about them is the amount of different sizes available to buy. This is great when your working with fabrics as you're not restricted to making things in particular sizes.

I hope this has been a useful post, and maybe explains some of the techniques I've used before, but haven't really gone into. Come back tomorrow for more of this. Fran xx


Wednesday, 15 August 2012

Weave Week: What to Weave With

Hello. A great place to start when exploring weaving, knotting and braiding is to look at the range of materials to use. Traditionally materials such as cotton cord, embroidery floss, leather thong and faux suede are great places to start, but are not the only options.

In the picture above are shown some of the popular materials to use. These include those mentioned above as well as ribbon, chain, velvet cord, fabric strips, organza, copper and aluminium wire. Even as I write this I am thinking of more and more ideas for elements to use. Thin plastic (recycle plastic bags), paper, felt, tapes, mesh, thin strips of wood are just a few of the ideas running through my mind.
 There are many real wool and polyester blend yarns to choose from.

Embroidery floss is very cheap and comes in thousands of colours.

I'm going to be doing my total best to get through all of these examples of materials, in as many different ways as I can fit into 14 days. I'm working through the book; 200 Braids to Loop, Knot, Weave & Twist. I'll show you all of my results (both the good and the bad), and will also be reviewing the book on the blog next week!

Tuesday, 14 August 2012

Tutorial Tuesday


  Tool list:  
Fabric strips / Chain / Cotton cord / Large link chain / Bell closer x 4 / 1.5mm elastic strip / Glue

  Instructions:   
Glue one end of the fabric and cord into a bell closer / Attach the chain to the loop of the bell closer as well as one of the larger chain links / Plait the long piece of chain, fabric strip and cord together / Attach the other end the same way as the beginning / Repeat these steps to create another plait attaching the ends to the same larger chain links as before / Thread the elastic through the larger chain link at each end and hand sew each end measuring to your head size as you go / Perfect for festival or beach wear, or just for those days when you need a little helping hand.


Hello. Just squeezing Tutorial Tuesday in tonight. Apologies for the moody looks in the photos. I put my back out playing tennis (badly) yesterday so today has been a long day, and to make matters worse I was loosing light!
On a different note I've had a lot of emails from other fantastic bloggers recently. It honestly makes my day when I get people asking me to be involved with their blog, or to partner up in some way. I guess it's that mark of approval from your peers that gives you a boost. So I'm very excited about collaborations and guest posts that are coming up soon.

Hope you've enjoyed this weeks Tutorial Tuesday. Fran xx


Sunday, 12 August 2012

INSPIRATION: Weave


Hello everyone! So here it is. The theme for the next couple of weeks. Weave. I've decided to extend the time we dedicate to each theme so I can really explore a variety of styles and do more DIY tutorials. I'm already worried it's not enough time for fitting everything based on this theme in, but here we go. I'll do my best!

So, to really put an end geometric week we need to announce the winner of the competition. Drum roll please................
Molly S Lester. You've won the ring mandrel and wire coils.

I hope everyone is well, and I'll be back tomorrow. See you then, Fran xx


Pin It button on image hover