new
Showing posts with label techniques. Show all posts
Wednesday, 3 October 2012
Beginner Techniques
There are a couple of different ways to heat shrink plastic. Either in the oven or with a heat gun. The oven is my favourite and, in my opinion, the easiest way to shrink you designs. The even heat distribution keeps the dimensions equal all over, and it also means you have more time to shape or flatten the piece after taking out the oven.
I've sprayed cream spray paint over this piece of lace trimming to show the change in size once it's been heated. The packet will usually give you examples of different pens, paints and inks that are suitable to use. I like to experiment with other materials as well. Sanding the sheet will help stabilise paints and inks that are not recommended, and once heated most substances should dry on. If your unsure just experiment with a small piece to see how it reacts. (Try not to poison yourself or set anything on fire when heating. Don't leave unattended and keep the room well ventilated!)
I use clean thick cardboard to place the pieces on in the oven. Again please don't leave it unattended because no one wants a fire in the oven. Especially not one that is burning all your new jewellery! Make sure you leave plenty of space around the edge of the cardboard and between each piece. (I've had pieces jump off the edge before and stick to the bottom of the oven... this ended in an unfortunate episode concluding in fire men knocking some doors down... they did not see the funny side.)
There should be heating instructions that come with you shrink plastic. I usually heat the oven to 170 degrees (Celsius) and leave the shrink plastic in the oven for around 5 minutes. I actually never get bored of watching the plastic curl and shrink. Don't worry it should uncurl, but if it doesn't take it out, pull apart and reheat. You can reheat shrink plastic once it has cooled to reshape. Just make sure you don't leave in the oven too long as it will overheat, and more than likely stick to everything...
Once you've taken it out of the oven flatten between to hard objects or shape using a ring mandrel (more examples of this coming up in the next month)
So that's one way of heating shrink plastic. I'll be writing about using a heat gun to do the same thing next week. I'm off to get ready for the Cosmo Blog Awards tomorrow. You know, paint nails, shave legs etc etc.. It's the first time I'll have met other bloggers and I can't wait to meet everyone!
More on that later this week. Fran x
Labels:
shrink plastic,
techniques
Thursday, 27 September 2012
How to: Open and Close a Jump Ring
Opening and closing jump rings is most likely to be the most used technique in jewellery making, and it's a really important one to get right. Having neat, secure jump rings is integeral to the aesthetics and function of each jewellery piece. Luckily it's also probably the easiest technique to learn as well.The best pliers to use are either chain nose, bent chain nose or flat nose pliers. You need a plier with a flat section so you can get a good grip on the jump ring (I have used round nose pliers in emergencies... no biggie). It's also pretty useful if you have two pairs (one for each hand) which gives you added control and keeps your nails intact! But if you only have one pair you can use your thumb and finger to do the same job.
It's best to grip the jump ring across as much of one side as possible. This gives you maximum control when using the other plier/hand to open the other side. Pull the other side towards you (or push it back). Don't open the jump ring by pulling the two sides apart in opposite directions. Doing this will bend the ring out of shape!
Once you have used your jump ring, close it back up again moving the ring back into shape.
To strenthen the ring and ensure it is tightly closed up push the two sides gently together whilst moving them back and forward.

And that's how to open and close a jump ring. Don't worry if it seems a little tricky at first. It takes a bit of practice to perfect, and I promise after a little time you'll be making perfect jump rings automatically!
Labels:
basics,
jump rings,
techniques,
tutorial,
tutorials
Saturday, 18 August 2012
How to: Attach clasps part two
Hi! As promised here is the second part of our How to: Attach clasps series. I wanted to mention here that these are just examples of how to use these findings. There are no set in stone materials and ways to use them (I can see the jewellery making purests screaming at their screens right now!). The way I see it is, if it works, then why not! Anyway, lets get going.
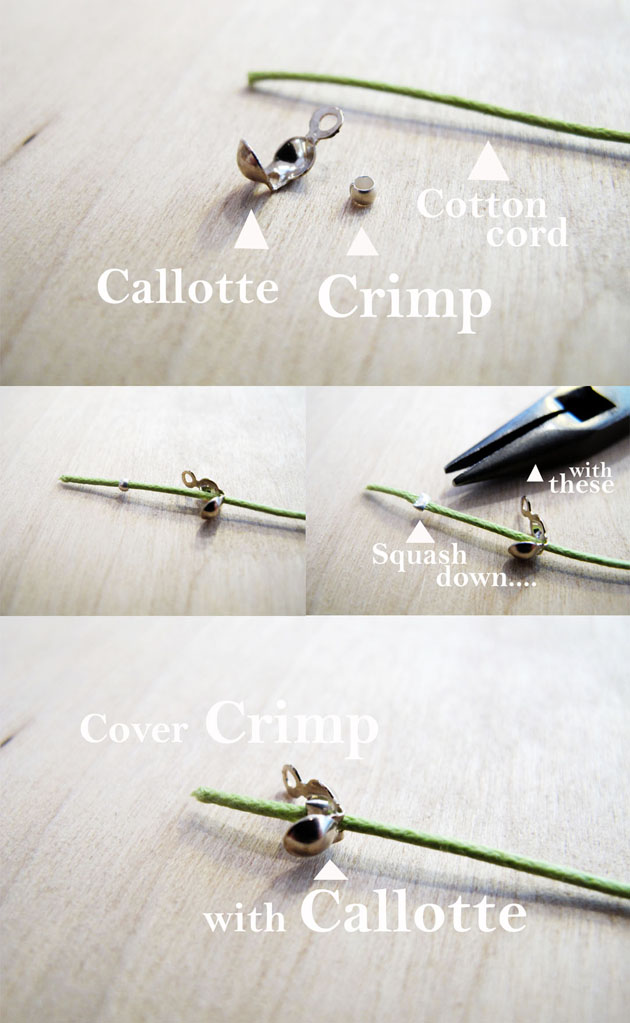
Number 4: Crimps and Callottes
Crimps are incredibly fiddly to use, so be prepared to loose a few because they ping off everywhere! You can buy crimping pliers, something I actually love using, but if your just getting started any pair of pliers with a flat surface will do just fine. An example of another way to use crimps is teahabs morse code bracelet tutorial.
Number 5: Wire Guardians
This is similar to using crimps with callottes but is a better solution if your making something heavy, or that needs to be particularly strong. The wire guardian protects the wire/stringing, and if required you can add extra crimps to give extra security.
Number 6: Wire wrapping.
If you have several strands to put together it can look a bit messy to inividually end each thread, especially if they're all different. One way to combat this is using wire to create your own ending.
You can wrap the wire neatly or if you're like me, in a chaotic fashion. Both ways can look great. It just depends what you like.
Like I said in Part 1, I have not covered every way you can attach clasps. There are plenty more ways that might suit you better or give better results. These are just some of my favourites.
Labels:
basics,
jewellery,
materials,
techniques,
weave
Friday, 17 August 2012
How to Attach Clasps: Part one
Hello everyone!
I've put together what was originally meant as one post about attaching clasps to different stringing material. It's probably one of the questions I get asked most about in the shop, and like a lot of things in jewellery making, it's so easy once someone shows you how!
Just so you know I have in no way created a comprehensive list of the different techniques available, but the 6 techniques I have described are far too much for one post, so I'll post part 2 tomorrow.
Number 1: Using box clasps/cord ends
One example of using this technique is the Plaited Bracelet tutorial. It can be used on pretty much any material, and is especially useful when using thicker stringing like faux suede or leather.
Number 2: Crimp Tube with Loop
This is a fantastic way to quickly and neatly attach a clasp to thinner cords. As with all of the other techniques shown in these two posts, it is entirely up to you which clasp to use with each finding type.
Number 3: Ribbon Ends
I think the best thing about the ribbon ends is that it keeps the ribbon/fabric nice and flat all the way around. It's a super way to keep a necklace/bracelet looking sleek and professional. Another great thing about them is the amount of different sizes available to buy. This is great when your working with fabrics as you're not restricted to making things in particular sizes.
Subscribe to:
Posts (Atom)