http://teahabs.blogspot.co.uk/ about home Image Map

new

new
Showing posts with label jewellery. Show all posts

Saturday, 24 November 2012

Checkmybox is here!


So finally, after this last two months of ideas, planning, making and then mostly panicking, Checkmybox DIY jewellery kits are now for sale! It has been a manic two months. Some fantastic times, when me and Hannah have really realised what we're capable of, and some not so great moments when the stress of starting a business becomes overwhelming (I'm pretty sure there will be plenty more of those moments...).
We've decided that if we stand any chance of staying positive and focused we have to celebrate the small achievements, taking note of each accomplishment before moving onto the next stage. This, it turns out much easier to say, than do. (until the second pint anyway...)

So if you'd like to purchase a kit, or just have a little look we now have all the kits on our Etsy page


and if your in Birmingham you can pop on down to Mr Birds Emporium in the Custard Factory and check out our little shelf of goodies.


Tuesday, 20 November 2012

Tutorial Tuesday


Here's another tutorial from the archive. As with the all the tutorials this month we will be releasing this as a kit with Checkmybox, this week! Keep your eyes peeled for that, and enjoy the tutorial.x


UPDATE: You can buy the materials to make this kit over at Checkmybox.co.uk or at our Etsy shop, making things even easier!


1. Using chalk pastels colour rectangular sections of a sheet of shrink plastic in four different colours.
2. Cut the sections into large isosceles triangles, around 10cm in length.
3. Using a hole punch make a hole at the bottom (shortest edge) of each triangle.
4. Heat them in the oven according to the instructions. They usually need around 3-5 minutes.
5. Using a 7mm jump ring attach the pendants to a 50cm piece of chain. Build this up in a random order, mixing up the colours.
6. When your happy with the design, put two jump rings and a clasp onto the end of your chain.

VOILA! Get out into the sunshine and show it off.

Wednesday, 7 November 2012

Tutorial Tuesday: Plaited Bracelet

To celebrate the launch of Checkmybox later this month we are re posting our most popular tutorials all throughout this month, and as it happens they will be our first range of kit designs. So if you like any of the tutorials over the next four weeks and are struggling to find the right materials and findings keep your eyes open for our kits that will be available exclusively in Mr Birds Emporium at the Custard Factory, Birmingham from 15th November, and online shortly afterwards (date to be confirmed). We'll be updating you with the website details soon and keeping you up to date on our progress as we actually make some!
Enjoy. Fran xx


UPDATE: You can buy the materials to make this kit over at Checkmybox.co.uk or at our Etsy shop, making things even easier!
Plaited Bracelet jewellery Kit


If you like this tutorial, check out my 2013 updated version on my new blog www.fallfordiy.com
for this neon plaited bracelet tutorial!

Instructions

1. Cut three pieces of cotton, each one metre in length. Then cut each of these into three equal pieces.
2. Attach the three pieces together with a box clasp at one end. Do this with all three colours.
3. Take a piece of large link chain around 18cm long. Measure this against you wrist and add or take off links as you need. The two ends of chain should meet.
4. Open the last link and thread on the box clasps in any order.
5. Starting three links in plait the cottons cords onto the chain. I like to check the cottons are threaded through the chain links in sequence to make sure my plait is correct.
6. Stop plaiting three links before the end of the chain and attach three more box closers on the ends. 7. Open up the last link of the chain then thread on the box clasps and a lobster clasp.

Friday, 26 October 2012

Designer of the month


Each month we're going to introduce you to some of our favourite up and coming local designers and artists from in and around Birmingham.  You may remember the amazing laser cut collar tips Fran wore to the recent cosmopolitan blog awards?  We collaborated with the amazing Working Clasp to create those beauties and today we've got the brains behind the whole operation Rebecca Cowley in to talk to us about her designs, inspirations and what the future holds for Working Clasp.
Rebecca is a graduate of the interdisciplinary textile design course at UWE and found a real love of using laser cutting and etching technologies to produce affordable perspex jewellery of her own designs.  Culturally symbolic silhouettes are often utilised to make witty statement pieces.  By picking out more abstract sections of her drawings she creates fusions of form and pattern giving her pieces a real individuality.  We've managed to get a little interview with the woman herself...with some characteristically abstract answers!


How would you describe Working Clasp?
A light hearted, tongue in cheek approach to adornment.

What led you to start making jewellery?
I discovered laser cutters at my University and was fascinated by the potential for transformation of recycled materials into precious objects.  Shit to good in seconds.


What are you inspired by?
The light in darkness.  The boiling freeze of a hot tap of emotion.  Birdsong.  The everyday revelations of life.  Teahab.

What did you want to be when you grew up?
A mermaid.


What's next for Working Clasp?
I am intrigued by the meaning stored in treasured objects, the memories they evoke.  I want to utilise laser cutting to develop a means of displaying precious images and fragments in a brash and contradictory manner.  I like the idea of juxtaposition in jewellery.  I want to create a vehicle for intangible thoughts of the wearer to be expressed.


Top Fives

Places
Venice
New York
In a fit of hysteria
Womens weaving centre, Louang Prabang
Top of the apple tree in my parents back garden

Artists/Designers
Vivienne Westwood
Rebecca Horn
Grayson Perry
Alexander Mcqueen
Reuben Ramos Balsa

Books/films
Only Forward: Michael Marshall Smith
Momo: Michael Ende
The Tremaster Cycle: Matthew Barney
Charlie and the chocolate factory (the original)
The Princess Bride

Things
Blu tac
Curry
Fleecy socks
Disgusting rings
Bargains

You can check out Working Clasps current designs on her Etsy shop http://www.etsy.com/shop/WORKINGCLASP, her Folksy shop http://folksy.com/shops/WORKINGCLASP, and Bigcartelhttp://www.workingclasp.bigcartel.com/  and she's currently stocked in The Dutty shop in bustling Stokes Croft, The Arnolfini Gallery in Bristol and Armadillo in Birmingham, Kings Heath.  She is currently working on new designs combining various materials such as veneers, vinyls and fabrics and will have a range of new pieces at the MAC Christmas fair on the 14th and 15th December, so if you're in the area it's definitely worth checking out for some extra special Christmas gifts. (You can catch us there on the 14th also!)


Wednesday, 22 August 2012

Two Minute Teahab


Hi. I wanted to share with this little genius with you today! The mini knitter...


I have to be honest. initially I didn't have very high hopes for this piece of sparkly plastic... but boy, can looks be deceiving. I know from previous experience that it can take more time learning to use these types of gadgets than it takes to make 10 things "the long way". This was quick, had relatively well illustrated instructions (some common sense was involved here) and is pretty damn addictive.


To make the finished pieces into bracelets I've used some of the techniques in from my previous posts; Attaching clasps Part one and Part two.


TOP: 1mm cotton cord / MIDDLE: Acrylic wool yarn / BOTTOM: Embroidery floss

I'm really happy with the results. I'd like to experiment with threading chain and/or beads into and through the tubes, and I also want to research if it's possible to make tighter stitches to produce a more condensed pattern with the thinner embroidery threads. Definitely something to look into!

Hope you've enjoyed the post today. Fran xx

Saturday, 18 August 2012

How to: Attach clasps part two


Hi! As promised here is the second part of our How to: Attach clasps series. I wanted to mention here that these are just examples of how to use these findings. There are no set in stone materials and ways to use them (I can see the jewellery making purests screaming at their screens right now!). The way I see it is, if it works, then why not! Anyway, lets get going.

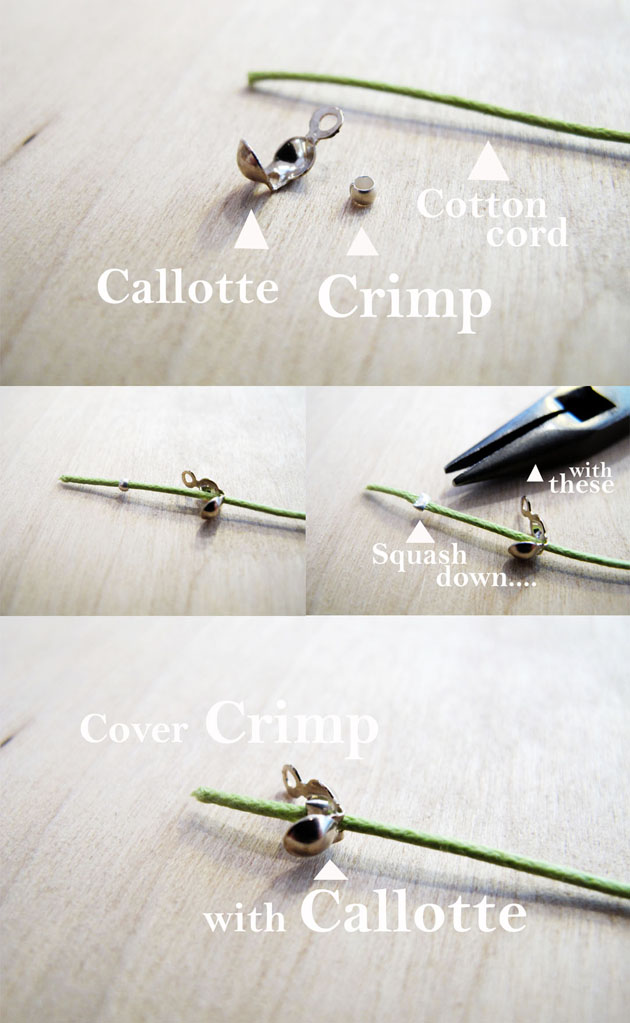
Number 4: Crimps and Callottes

Crimps are incredibly fiddly to use, so be prepared to loose a few because they ping off everywhere! You can buy crimping pliers, something I actually love using, but if your just getting started any pair of pliers with a flat surface will do just fine. An example of another way to use crimps is teahabs morse code bracelet tutorial.

Number 5: Wire Guardians
This is similar to using crimps with callottes but is a better solution if your making something heavy, or that needs to be particularly strong. The wire guardian protects the wire/stringing, and if required you can add extra crimps to give extra security.

Number 6: Wire wrapping.
If you have several strands to put together it can look a bit messy to inividually end each thread, especially if they're all different. One way to combat this is using wire to create your own ending.
You can wrap the wire neatly or if you're like me, in a chaotic fashion. Both ways can look great. It just depends what you like.

Like I said in Part 1, I have not covered every way you can attach clasps. There are plenty more ways that might suit you better or give better results. These are just some of my favourites.


Friday, 17 August 2012

How to Attach Clasps: Part one

Hello everyone!
I've put together what was originally meant as one post about attaching clasps to different stringing material. It's probably one of the questions I get asked most about in the shop, and like a lot of things in jewellery making, it's so easy once someone shows you how!
Just so you know I have in no way created a comprehensive list of the different techniques available, but the 6 techniques I have described are far too much for one post, so I'll post part 2 tomorrow.

Number 1: Using box clasps/cord ends


One example of using this technique is the Plaited Bracelet tutorial. It can be used on pretty much any material, and is especially useful when using thicker stringing like faux suede or leather.

Number 2: Crimp Tube with Loop
This is a fantastic way to quickly and neatly attach a clasp to thinner cords. As with all of the other techniques shown in these two posts, it is entirely up to you which clasp to use with each finding type.

Number 3: Ribbon Ends
I think the best thing about the ribbon ends is that it keeps the ribbon/fabric nice and flat all the way around. It's a super way to keep a necklace/bracelet looking sleek and professional. Another great thing about them is the amount of different sizes available to buy. This is great when your working with fabrics as you're not restricted to making things in particular sizes.

I hope this has been a useful post, and maybe explains some of the techniques I've used before, but haven't really gone into. Come back tomorrow for more of this. Fran xx


Sunday, 12 August 2012

INSPIRATION: Weave


Hello everyone! So here it is. The theme for the next couple of weeks. Weave. I've decided to extend the time we dedicate to each theme so I can really explore a variety of styles and do more DIY tutorials. I'm already worried it's not enough time for fitting everything based on this theme in, but here we go. I'll do my best!

So, to really put an end geometric week we need to announce the winner of the competition. Drum roll please................
Molly S Lester. You've won the ring mandrel and wire coils.

I hope everyone is well, and I'll be back tomorrow. See you then, Fran xx

Saturday, 11 August 2012

Just one last Geometric post

Hi everyone. I'm dead excited cause I've just watched Mo Farah win his second gold medal! I'm absolutely gutted it's all over tomorrow, but at least I've still got plenty to catch up on... the Olympics live on... well, in my bedroom anyway...

Back to business then. As promised here are some of the other geometric makes from the past two weeks. We're starting our new theme tomorrow and I'm already loving it! Come back then to find out more. I'll also be announcing the competition winner. If you haven't already entered you can find out how easy it is here. You still have time!
Hope your all having a great weekend. Fran xx


Tuesday, 7 August 2012

Tutorial Tuesday: FREE PRINTABLE GEOMETRIC PATTERN


Shrink plastic is perfect for geometric designs. The glossy, manufactured look is perfect for the kind of industrial feel you get with repetitive lineal patterns. I've made three variations of the same necklace using different types of shrink plastic, but I would love to make this in a hundred different ways/colours/effects. You're really only limited by your own imagination!

Follow the link below to access the free PDF to create this design. Make sure the design is set to 100% and that you check the "actual size" box on the print options screen (as shown below).


1. Print out the required pattern. 2. Using masking tape secure the pattern to the shrink plastic. 3. Carefully cut out the design using a ruler (don't cut your fingers off!!). 4. Remove the paper stencil and "cook" in the oven following the instructions on the packets. It usually takes just a few minutes. 5. Whilst cooling flatten the plastic between hard, flat objects (such as wooden blocks) to make sure it stays nice and flat. 6. Attach to a chain using a large jump ring.

Et Voila! Perfect geometric charm for any outfit!

Wednesday, 1 August 2012

Checkmybox: Update

For those of you unaware, checkmybox is a start up me and Hannah have been building slowly to focus on once we leave the bead shop at the end of the month. Boy, that has crept up on us quickly. We still have a mountain of work to do, and I guess these posts are quite cathartic so I can document what we've done and need to do, but hopefully you'll take something away from this as well.

This week we have finalised our jewellery kit product list, sourced supplies, worked out costings and started designing the artwork. Each of these aspects have their challenges and difficulties, but I've actually enjoyed the learning process much more than anything else. I think that's the most fulfilling part of starting a business that I've encountered so far (although we're really not very far in).

I've been discussing checkmybox with our customers at the bead shop quite a lot recently. Listening to their thoughts and experiences it is clear that people want to learn jewellery making techniques but apply them to modern jewellery in fashionable ways. This is really what Checkmybox is all about. Finding ways to learn using traditional materials and techniques without making outdated pieces, so you can take more than just a skill away from a workshop is much more appealing.

We are planning to launch our workshop calender very soon. These will reinforce our ethos, and be a welcome break from the online side of things to actually see and speak to real people! Teaching and passing on our skills in one of my favourite components of jewellery making, so I'm looking forward to developing an interesting range of sessions to get your teeth into.

Here is an exclusive preview of one of our planned jewellery kits. (It fit so well with geometric week I couldn't help myself!)


Sunday, 29 July 2012

INSPIRATION: Geometric


It's geometric week. We've got loads of tutorials planned for this feature. Jewellery plays a big part splashing colour to a pattern focused look. I'm looking forward to using a range of natural and synthetic materials to create harder and softer styles. oh yeah, and we have our first competition coming up tomorrow! Fran xx


Pin It button on image hover